If you are a newbie graphic designer and suddenly searching for how to change 72 dpi to 300 dpi, as your senior said so, then today’s guide is for you.
So, why do people mostly talk about 72 and 300 DPI?
DPI, or dots per inch, is a historically established unit that indicates the printing quality of an image. In the early ages of printing, 72 dpi was the standard quality, specifically on the Apple Macintosh computers back to 1980
With the advancement of technology, the bar rose higher. Later, the first LaserJet printer of HP, which could print 300 DPI, set a new standard globally. As it was sufficient to balance both, print quality and technological abilities of that time, for business and professional documents. Today, we will also learn how to convert 72 dpi to 300 dpi in Illustrator, Photoshop, and other platforms. Let’s start!
What DPI Means
DPI means how many dots per inch your printer uses to generate an image. The more dots your printer can produce, the better it can copy the details of the original image. Additionally, your printing quality improves when the DPI rate is high.
As we all know, pixels are mainly responsible for high-resolution images on screen. So, DPI alone does not add details or pixels. If your original image contains a lower pixel count, eventually it will affect the printing quality.
It is wise to use a high-resolution image if you want to prevent pixelated or blurred printing. To know more, read this.
How to Change 72 DPI to 300 DPI in Photoshop
Are you thinking, “How do I convert 72 dpi to 300 dpi in Photoshop?” Well, it requires a few steps to convert 72 dpi to 300 dpi in Photoshop. Here I will show how:
With resampling
- Firstly, open your image in Photoshop
2. Open the image size option. If you are a Windows user, press Alt + Ctrl + I to open the image. If you are a Mac user, press Option + Command + I. - Check the box Resample.
- Now, you will see the Resolution field in the size dialogue box.
- Now, set the resolution. Simply change the value of the resolution from 72 to 300. Make sure the resample box is unchecked; otherwise, Photoshop will also change the pixel dimension, which will affect the original quality.
- Now click “OK”, and your picture is all set. Then go to the “File” option and click “Save As”.
For high-quality image printing, this method will ensure your image quality and adjust to the pixels.
Without resampling
Just keep the box “Resample” unchecked and repeat steps 3-5 as the same. This method is beneficial if you do not want to alter image quality.
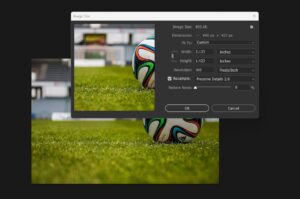
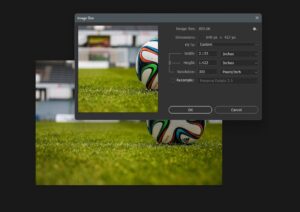
Here I have added an image to show you how to change 72 dpi to 300 dpi in Photoshop easily.
You are now all set to start printing. After printing, you will get better image quality than that of the 72 DPI.
How to Convert 72 DPI to 300 DPI in Illustrator
You can also change the dpi of an image using Illustrator. It takes 3 steps to convert 72 dpi to 300 dpi: adjust document raster effects settings, set resolution during export, and verify your image resolution.
Just follow the steps below:
Adjust the raster effect
- Navigate to the “Effect” option and click “Document Raster Effects Settings.”
- Click the “Resolution” option from the dialog box and select ”High”.
- Then click the “Anti-aliasing” option and select “Art optimized”. This approach will ensure a better quality of your image
- Click “OK” to save these changes.
Set resolution during export
You can set the resolution while importing your image to raster format. This will improve your image quality and protect the details. Here are the steps:
1. Go to the” File” and then select “Export” and click “Export As.”
2. Choose a suitable format for your image among the options. For example, JPEG and PNG.
In the export dialog:
- Resolution: Select “High” (300 ppi) or input a custom value.
- Then choose the background color for your image if necessary. For PNGs, you can choose a transparent background. Reddit
- Click “OK” to export.
Pro tip: Avoid using “Save for Web” for print purposes. It will convert your image again to 72 PPI (as it is by default for digital displays).
Image resolution verification
1. Open the exported file in Photoshop.
2. Click “Image ” and select “Image Size.”
3. Check the resolution. It will display 300 dpi.
If the resolution is not changed, double-check your export settings.
Change 72 dpi to 300 dpi without resampling
This method is particularly effective if you are working with a pure vector design. In this case, no DPI is required, but you can still export 300 DPI print quality without resampling raster elements. All you need is to follow these steps:
-
Go to the File option and select Save As
-
From the dialog box, choose Adobe PDF.
-
Now go to the “PDF Settings” and choose High Quality Print or Press Quality.
-
Navigate to the “Compression”, now check that “Downsampling” is disabled for color/grayscale/monochrome
-
Save the PDF.
How to Convert 72 DPI to 300 DPI on Mac
If you are a Mac user, you can achieve the desired dpi in two ways: using the preview option without resampling and with resampling. Here, I will try to break down the details.
Using preview (without resampling)
Purpose: This approach will adjust the DPI metadata without changing the actual pixel information of the image.
Steps:
- Open your image in “Preview.”
- Go to “Tools” and select “Adjust Size.”
- In the opened dialog box, uncheck the box “Resample image.”
- Click “OK” to save.
Changing DPI with resampling
Purpose: This approach will adjust the dpi metadata and also the actual pixel dimensions of the image. This method is useful when you need to change both.
Steps:
- Open your image in “Preview.”
- Go to “Tools” and select “Adjust Size.”
- Select the box “Resample image.” Ensure that it is checked.
- Set the resolution to 300 dpi.
- Adjust the weight and height as you need.
- Click “OK” to save.
Note: As this method directly affects the pixels, it may often lead to a loss of sharpness if your image resolution is comparatively lower.
Tips:
Make sure your image has high resolution. For example, if you want to print an image of 6*4 inches, your image must be at least 1800×1200 pixels to fit 300 dpi per inch.
Conclusion
Congratulations! I hope this guide has all the information on how to change 72 dpi to 300 dpi on three platforms.
Remember, DPI alone is not enough if you want a quality print of your image. An image of 72 DPI indeed consists of a lower pixel count to deliver quality printing output.
To increase your image resolution, you can use Pixi AI and other online platforms. This approach will help you to change 72 DPI to 300 DPI.
FAQ
How to change 72 DPI to 300 without Photoshop?
Ans: You can use the preview option on Mac or use online free converters or tools.
How to change 72 DPI to 300 DPI in Illustrator?
Ans: Go to the “Effect>Document Raster Effects Settings> Set the resolution to 300, then save or export your image.