Are your images showing a few unusual lines or blurry prints in your Microsoft Paint? With time, I learned this issue happens due to insufficient DPI, which is crucial for clear printing quality.
I found a few remedies to overcome this problem, and today, we will learn effective strategies about how to increase the DPI of image in Paint to prevent this issue. We will also touch on alternative tools and tips for DPI customization. Let’s start!
Understanding DPI and Image Quality
What is DPI?
Many people often mistakenly believe that PPI and DPI are both the same, but they’re not. DPI means dots per inch in your printed image. It directly refers to the density of a printed image. Higher DPI shows better printing quality because it holds more dots; you can say it has more information about the original image.
DPI vs PPI
On the contrary, PPI is related to digital images. PPI indicates the number of pixels per inch of an image displayed on a screen; PPI indicates the image resolution. A higher PPI indicates higher image resolution quality.
For example, an image with a resolution of 5,000 x 5,000 pixels will provide a sharper and clearer visual experience than one with a 1,000 x 1,000 pixel count. If you are a content creator who uses a lot of images and repurposes YouTube videos regularly, make sure to update the resolution.
Before jumping into the methods, it’s important to understand how DPI affects image resolution. DPI points out individual ink dots laid on your image by the printer. Consider DPI like a brick of a building; it says how many dots were involved to create a copy of the digital image.
Why is DPI important for printing?
I hope you have started to understand the reason for missing image parts or unnatural lines on printed images. Let’s see how DPI affects image quality:
Image Details: When your printer can’t produce enough DPI to print out the full picture, you see some portions are missing or filled with colorful horizontal lines (red, black, yellow, or others).
Image Smoothness: You can take two low-quality and high-quality printed images and compare them firsthand. The higher one will almost cover every color indeed in the original digital image input.
On the other hand, low-quality ones will show one or two shades lighter or even a different shade. Higher DPI prevents such distortions, as it holds a lot more DPI to match the exact quality.
Sharpened edges: As I mentioned earlier, if you compare a high-DPI image with a lower one, you will observe finer edges and lines and much clearer objects in the high-DPI printed image.
You might ask me, “Is there any DPI standard?” Here are the most common DPI values and application details for you:
72 DPI: It is considered standard for basic on-screen view, as most of the monitors have a similar pixel quality. However, this quality is not sufficient if you need high-quality image printing. In that case, it still may result in blurriness or sketchy lines.
150 DPI: This one is considered suitable for documents, drafts, and some magazine printing, where extremely fine detail isn’t critical.
300 DPI: This value is widely recognized as the gold standard in professional printing. This value brings life to your high-quality photo printing, brochures, magazines, and other professional print materials, where sharpness and detail are top priority.
How to Check DPI of an Image in Paint
It takes only 4 steps to check the DPI of an image in Microsoft Paint:
1. Select your image and right-click it. Now select “Open with” and click Paint
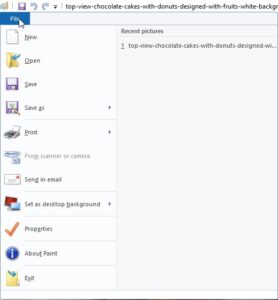
2. Once your image is opened, look at the top right corner for the “File” option and click on it.
3. Now search for the properties option and click.
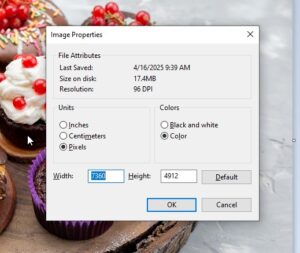
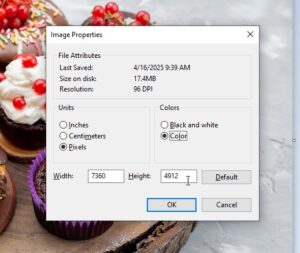
4. A dialog box will open and show you the DPI. You can change if you want to.
If you open multiple images, you will see 96 dpi as the default resolution. The reason is that Windows and Paint both have these default settings for image resolution to display. Although higher resolutions are also common, this historical setting remains the same due to compatibility.
How to increase the DPI of image in Paint
Now, we have come to our main course. To increase image DPI, I follow these steps:
- Open your images in Microsoft Paint.

- Go to the File option.
- Select the Properties option, a dialog box will open.
- Copy the higher DPI values and enter them in the lower ones.
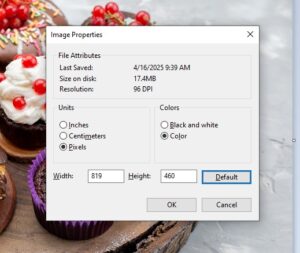
- Click “OK” and save your picture.
Unfortunately, Paint 3D doesn’t have a DPI checking option. Instead, you can check the pixels or resize an image by locking the aspect ratio. Keep in mind that while you are adjusting the DPI, it does not add more pixels. It simply instructs the DPI quality for printing.
That means if your image has lower pixel values than your desired image standard, your high-DPI printing will continue its job. As a result, a low pixel count will result in a blurred image. To avoid such incidents, keep a relevant PPI and DPI ratio in both digital and printing tasks.
Limitations of Increasing DPI in Paint
As I said, increasing your image’s DPI alone won’t ensure the desired outcome. DPI has some barriers when it comes to top-tier visual jobs. Here is how:
No new pixel is added
DPI only works for the printer and guides for a certain mission. Changing the DPI in Paint simply tells your printer to include more dots for the exact amount of pixels per inch. It can’t improve image information by adding more pixels.
Small print size
Without changing the pixel count, your image will often print as a comparatively smaller size than you want. You need to modify pixel dimensions if you want a larger image output.
Quality loss
Pixels work directly on improving an image’s details. Forcing a significantly high DPI for a low-resolution image will lose the quality standard and may even end up printing a faded image with sketchy edges.
No advanced resampling
Cutting-edge AI tools and editing software use advanced resampling algorithms to predict pixels when you increase pixel count. These tools even polish the image and include more image details. Paint has limitations and is only able to follow a manual work process to update the DPI amount.
Basic editing only
For high-quality visuals, simply relying on DPI modification will not meet the standard. Paint is designed for primary editing only. For professional-grade visual output, you need to go through a more detailed editing process.
To sum up, DPI doesn’t provide the expected quality when you need to edit for high-resolution magazines or repurpose video content.
Alternative Tools for Better DPI Adjustments
These alternative tools will help you to make sure there is an efficient balance in both PPI and DPI:
GNU Image Manipulation Program offers some outstanding image editing features that are essential for common professional image editing. It is a free, open-source editor to perform image scaling and resampling. Follow these simple steps to adjust your DPI with GIMP:
- Open your image in GIMP.
- Select the “image” from the menu bar at the top. Then select the “scale image.”
- In the dialog box, you will see the X resolution and Y resolution details with DPI. Now, change the values. You can also change it by clicking the up arrow key in the box.
- Once you are satisfied with your DPI values, click “ok” to save the image.
Photoshop is one of the most used tools worldwide for professional image editing. Here are the steps to increase your DPI with it:
- Open your image with Photoshop.
- Go to the image option at the menu bar, then click image size.
- In the dialog box of the image size option, you will see the image details (pixels, width, height, and resolution).
- Now choose your resolution (96 or 300). Make sure the resampling box is checked.
- Photoshop will do its best to cover up the pixels and scale up the image for your desired DPI.
- Click “ok” to confirm.
Online DPI Converters
Thanks to free online converters! We can instantly use them anytime to edit any image. I recommend using DPI Converter and Convert-Town, but you’re free to choose any available one. You will find these steps common in almost every existing online converter:
- Upload your image first.
- Look for the changing options.
- Enter your value or adjust it via the automated feature.
- Click ok and wait.
- Once you are happy with the result, download and save the image.
You can also use PIXI AI’s “Universal Upscaler” for free to upgrade your image quality in a minute. Moreover, PIXI offers real-time high-resolution images, motion generation, and canvas editing features at a very reasonable price.
Read this to know more in detail.
Conclusion
Knowing how to increase DPI of image in Paint provides a quick solution for simple projects. To achieve truly professional results, use more sophisticated tools, especially when working on repurposed YouTube videos or preparing images for commercial printing.
For the non-professional users, Paint’s built-in DPI adjustment is enough for basic needs. In the case of professional-grade graphic editing, I highly recommend using Pixiai’s image upscaler to deliver superior results with minimal effort.
Ready to transform your images from average to outstanding? Try Pixiai’s Universal Upscaler today and experience the difference.