Print and electronic media often require larger image formats, and upscaling is the best way to fit the criteria. But this task comes with challenges like blurred or pixelated prints. To avoid this, there are a few effective methods available to enlarge photos or images without sacrificing quality.
The right approach depends on your specific needs, technical skills, and budget. Here’s a comprehensive guide on how to upscale an image without losing quality.
Understanding Image Upscaling
When you want to make image larger without losing quality, you’re essentially asking software to create new pixels that didn’t exist before. In traditional methods, the tools guess the pixels, then create new pixels to fill the area.
This approach often results in blurry or pixelated results because it uses simple techniques like nearest neighbor or bilinear interpolation that don’t add meaningful detail. Here I have explained them in simple terms:
Technical Background on Upscaling Methods
- Traditional Algorithms:
- Nearest Neighbor: Simply duplicates pixels by copying the value of the nearest pixel , creating a blocky appearance. The simplest existing method to blow up picture without losing quality.
- Bilinear: An average neighboring pixels method that uses four nearest pixel values to estimate the new one. As it lacks fine detail preservation, it’s only suitable for general quality photo enlargement.
- Bicubic Interpolation: Uses a 4×4 pixel sample for sharper images, but still lacks detail preservation and is costly.
- Lanczos Resampling: The more complex algorithm (uses mathematical sinc functions) that reduces artifacts but can introduce ringing effects.
- Spline Interpolation: It uses polynomial functions for a smoother curve fitting than bicubic. This method is mostly suitable for vector and medical imaging
- AI-Based Technologies:
- Convolutional Neural Networks (CNNs): Trained on thousands of image pairs to recognize patterns, analyze, and predict the object’s location within the image.
- Generative Adversarial Networks (GANs): Use competing neural networks to generate realistic details. Moreover, GAN can enhance image resolution and translate an image to image, transform images while preserving the key features,
- Diffusion Models: The latest technology incrementally adds realistic detail from noise patterns.
Best Methods for High-Quality Image Upscaling
1. AI-Powered Upscaling Tools
Cutting-edge AI-powered tools are trained with huge data samples. They use advanced resampling models and algorithms to make image larger without losing quality. Additionally, analyze the possible scopes to improve your low-resolution photo.
Modern AI-based solutions provide the best results for enlarging images without quality loss. Here I will mention the top 5 among them:
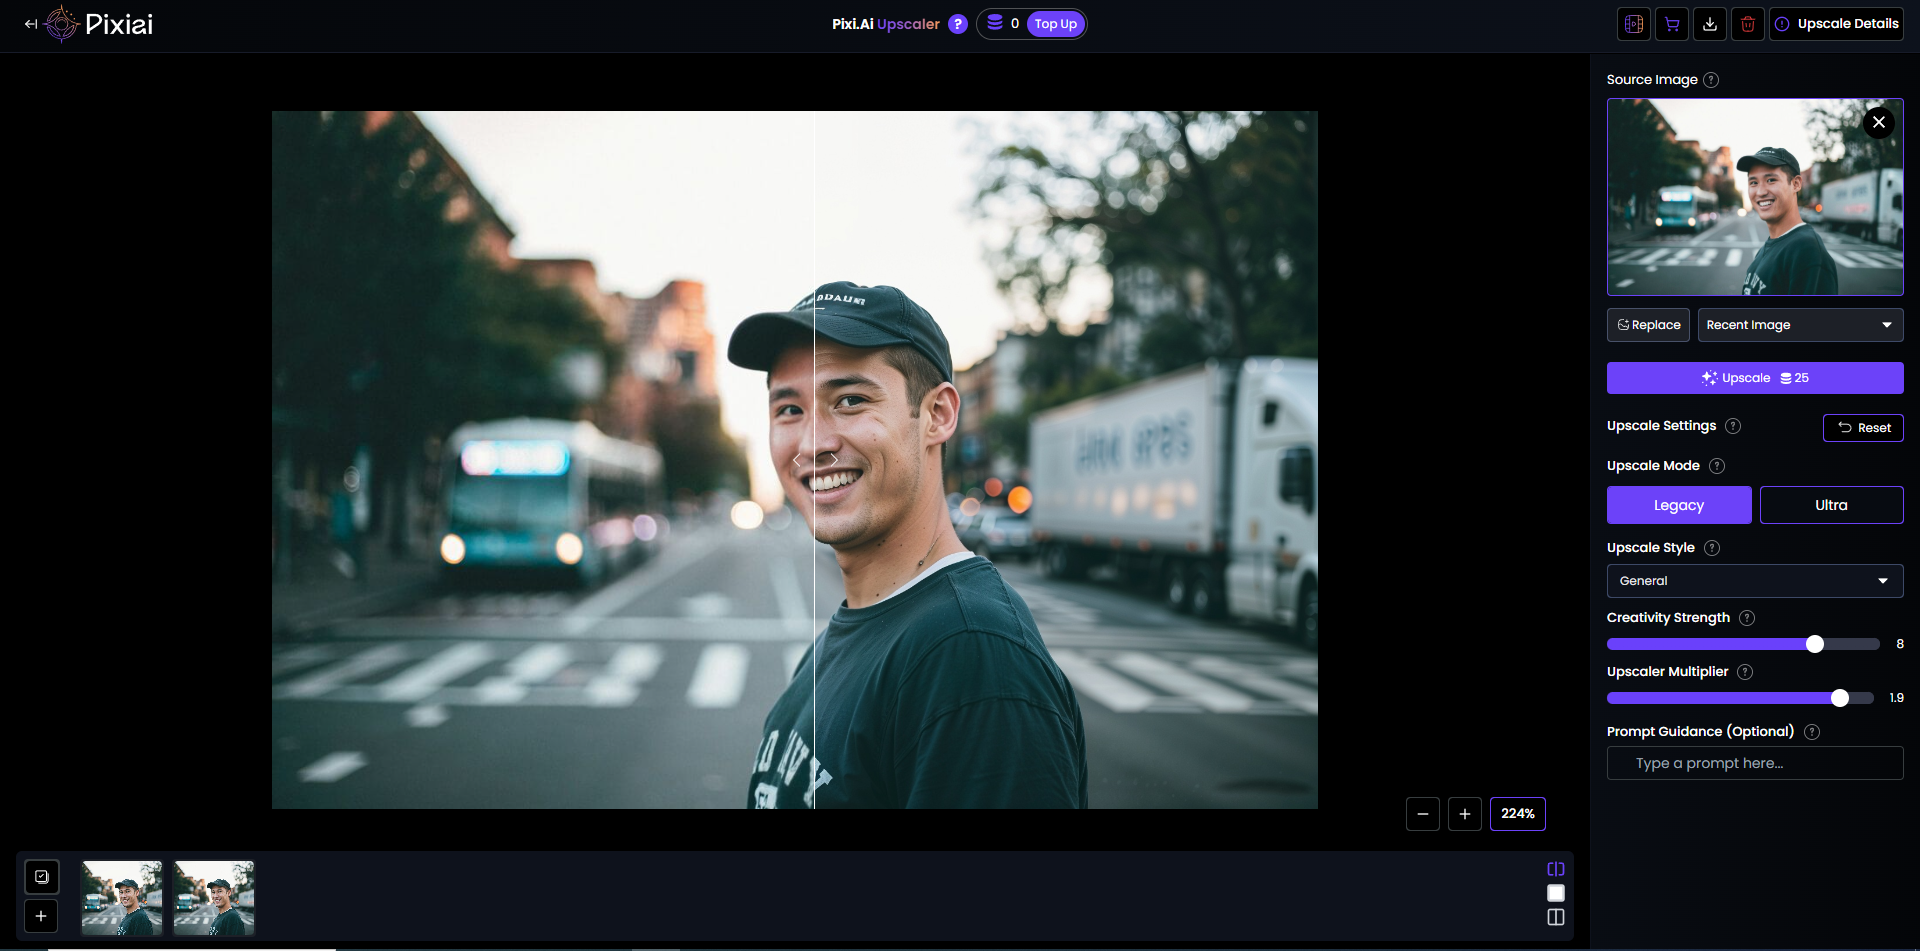
Pixi AI
Pixi AI can generate high-resolution images and upscale your image quality up to 10x. This AI-powered tool can also interpret text input and generate real-time images and motion videos in a minute.
On top of that, it can create detailed interior designs, which makes it the top choice for all types of users. Here I am showing you how oto upscale an image with Pixi AI.
- Special feature: Its advanced algorithm can detect and preserve image details while improving the pixel quality. This AI-powered tool can also interpret text input and generate real-time images and motion videos in a minute.
- Best for: Real-time visual content creation and architecture designing.
Topaz Gigapixel AI
You can rely on this AI tool, as it is specially designed for image enlarging with smooth upscaling. Additionally, it also protects original elements without losing quality.
- Special feature: It has superior facial feature detection and image analysis ability that allows it to predict and generate realistic details.
- Best for: You can enlarge images up to 6x while maintaining natural textures

Adobe Photoshop’s Super Resolution:
Available in recent versions, it uses AI-powered machine learning models to intelligently increase image resolution.
- Special feature: This tool can preserve and enhance image details and can minimize artifacts as it’s trained to suppress noise.
- Best for: Works best with RAW files as it gets solid image details and pixel information. Ideal for large-sized image printing tasks.
Stable Diffusion-based tools: This open-source option is best known for flawless text-based interpretation and effectively “imagining” ultra-detailed images. Furthermore, the stable diffusion system uses a cutting-edge denoising process to generate text-based images and upscale them.
- Technical advantage: An advanced denoising method can fill in missing details to upscale your image to high-resolution quality. and
- Best for: Models like R-ESRGAN and Aiarty can process multiple images at a time, which is very flexible for photography, digital arts, and other design formats.
If you are searching for how to increase size of image without losing quality, then these methods will benefit you for pro-quality output.
2. Professional Software Solutions
Photoshop: You can upscale your image by using the “Image Size” dialog with the “Preserve Details 2.0” option or the “Super Zoom” feature. Photoshop utilizes deep learning AI models to predict appropriate pixels to upscale while allowing users to customize sharpness and reduce noise levels.
- How to use: Adjust the “Reduce Noise” slider between 20% and 30% to prevent the amplification of artifacts.
- Pro tip: Use multiple smaller upscales (e.g., two 150% increases instead of one 200%)
GIMP: Free alternative with various interpolation scaling algorithms.
- How to use: Use the Sinc (Lanczos3) algorithm for best detail preservation in the large-sized image printing process.
- Pro tip: Consider splitting the image into layers if dealing with large files to reduce processing strain. Apply Filters > Enhance > Sharpen after upscaling to enhance sharper details.
On1 Resize AI: Specialized for creating large prints while preserving detail. It enhances image details through learning and detecting the edges, patterns, and textures.
- Technical benefit: Includes specific presets for different image types (portraits, landscapes)
- Pro tip: Use built-in sharpening feature for crisp detail. Try to go with two stage (e.g., 200% → 200%) for better detail retention if you are working to enlarge your image significantly.
3. Online Services
Several websites offer convenient upscaling. Here I will recommend these three platforms to resize image without loosing quality:
- Let’s Enhance: User-friendly interface with AI-powered enlargement. This tool can also add realistic details after recognizing patterns.
- Technical capacity: Offers specific models for illustrations vs. photographs. You can also sharpen your illustrations, cartoons, or animations.
- Processing tip: Their “Structure” model works best for architectural images.
- Icons8 Smart Upscaler: You can access a free version with limited usage, while paid options are available for higher resolutions.
- Technical approach: Uses algorithms for filling edges, including unique face enhancement for portraits.
- Best used for: Product images, portraits, and illustrations enlargement. Also good to go to make image larger without losing quality.
- Img.vision: Helps in quick image processing without registration for basic needs. You can use its features like image compression, CDN delivery, and watermarking.
- Technical limitation: Less advanced than other dedicated tools, but faster in processing.
- Usage tip: Best for quick 2x enlargements when quality is not absolutely critical, particularly for e-commerce platforms.
Advanced Technical Tips To Upscale an Image Without Losing Quality
Resolution-Specific Approaches
- For 2x Upscaling (e.g., 1080p to 4K):
- Fix the basic elements first—color, framing, and denoising.
- Use AI tools with a moderate detail enhancement setting (~40%)
- Apply a subtle sharpening filter afterward; avoid it before upscaling.
- Consider noise reduction before upscaling if the original has grain/noise
- For Extreme Upscaling (4x+):
- Split the process into multiple stages of 200% each
- Apply minimal sharpening between stages (Unsharp Mask at 25%, 0.5 radius)
- Use a denoising pass at the beginning to prevent noise amplification
File Format Considerations
- Before upscaling: Convert lossy formats (JPEG) to PNG to prevent additional compression artifacts
- Color depth: Process in 16-bit if available to prevent banding in gradients
- After upscaling: Save your image file in suitable formats, such as:
- PNG for web graphics and screenshots
- TIFF for print preparation
- PSD/XCF for further editing
- Only use JPEG (quality 90 %+) as the final delivery format if the file size is critical.
Advanced Monitor Calibration for Accurate Assessment
- View upscaled images at 100% zoom to properly evaluate quality.
- If possible, use hardware-calibrated monitors for work that requires accurate color representation.
- Evaluate quality from the intended viewing distance (e.g., a large print examined from 3 feet may appear acceptable even if pixels are visible upon close inspection).
Specialized Techniques To Upscale an Image by Type
Photographs of People
- Use AI tools with face-recognition and portrait-scanning capabilities (Topaz, Remini)
- Use selective noise reduction on the skin areas before upscaling.
- To handle textures and details separately, consider using frequency separation techniques.
Text and Diagrams
- Vector conversion often shows better results than regular upscaling.
- If upscaling is necessary, use specialized settings that prioritize edge contrast.
- Apply sharpening specifically to the edges of the text only.
Artwork and Illustrations
- Utilize various models trained on specific visual formats according to the illustration, art, or photo style, with some models specifically designed for artwork (such as Waifu2x for anime-style).
- For line art, consider tracing to vector format instead of upscaling.
- Utilize selective color quantization to preserve sharp color boundaries.
Batch Processing Large Collections
- Use command-line interfaces or batch processors for multiple images
- Run a sample test on a few images before committing to a full batch
- Consider CPU vs. GPU processing based on your hardware (GPU significantly faster)
- Estimate processing time: approximately 10-30 seconds per megapixel on modern systems. It usually takes 30 seconds to 1 minute to process 3-5 images.
Colclusion
Image upscaling technology is rapidly improving, especially with the help of AI tools. Keep it in mind, none of these tools or techniques are 100% accurate, yet they can show impressive, realistic results. AI-powered tools like Pixi AI, Adobe Premium, and a few free resizing platforms offer basic to professional image upscaling.
While working with professional-grade image enlarging, start with a good quality and follow step by step process and recheck to achieve the ultimate result.